Thread: Limit Switches
-
12-08-2007 #1The limit switches are micro switches with an attached lever.Hello can somone please tell me what limit switchs are used for?, going off what i'v seen on a few builds i'm thinking they are put in places that would get them switched when the moving parts of your machine gets to a point where it should stop and go back the way it came ? like a safty device ? is this right or am i well off base with this ?
They are available from RadioShack and the like; the ones shown here are from Mouser.com (part number 101-1203).
They are single pole, double throw and are wired to be Normally Closed, rather than Normally Open.
In this configuration any open connection problems in the circuit will trigger a stop.
If wired Normally Open, an open circuit due to a faulty connection would not be noticed by the software, and no signal would be received when the switch was hit.
All switches are wired in series with each other; therefore, only one pin of the parallel port is used for all switches. All motion ceases when any switch is struck.
The photos are of the 17 x 20 tables.
The switches for the X axis are mounted directly on top of the X end plates; there is one at each end of the table and they are activated when the gantry rail support or gantry end plate strikes the switch.
A probe is attached to the gantry end plate on the spindle side; this is aligned to trigger the switch since the spindle prevents the gantry from touching the X end plate.
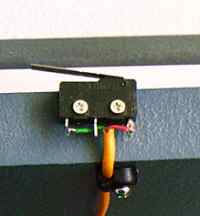
The probe can be anything from a piece of coat hanger to a dowel or paint paddle. Alternatively the switch can be mounted on the X rail support so that it is triggered by a bearing.
The left picture shows a switch on the Y axis. Again, one is on each end of the axis, and they are mounted onto the gantry end plate with a piece of 3/4" angle.
Their levers are moved by the tails of the machine screws, which hold the bearing truck into position.
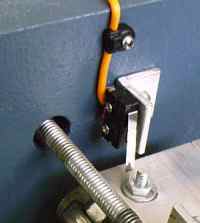
There is only one switch on the Z axis, right image, since the axis can extend farther than the depth of the bed. This kept the options open for different leg lengths on the table. The switch is mounted on the top of the axis, and its lever is activated by the Z rail support.
Below is a schematic for a simple limit switch.
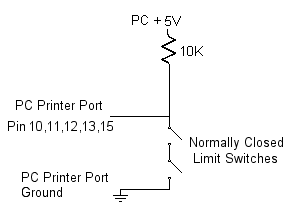
The idea is straightforward.
The parallel port pin is connected to the computer's +5vdc power supply through a 4.7k to 10kΩ resistor; this was a half watt unit. The resistor protects the parallel port from the excess current that it would receive were the pin directly hot wired to the power supply. The 5v pulls the pin high.
Also wired to the same pin on the parallel port are the Normally Closed limit switches linked in series. One wire is connected to the pin and the other wire from the switches is grounded to the computer's power supply low voltage ground. When the switches are all closed, the parallel port pin sees ground. It will be pulled low since the current from the power supply will take the path of least resistance and seek ground through the switches rather than through the parallel port.
When any one of the switches is open the current will travel to the parallel port pin, and the pin will be pulled high. The software is told to stop the machine when the signal is high.
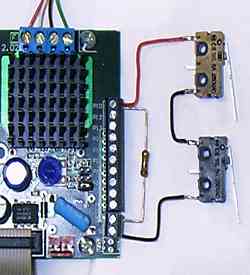
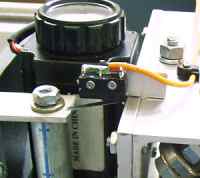
Above is a picture of one end of the Xylotex board with a pair of limit switches and a pull-up resistor. One end of the 10kΩ resistor is connected to the +5vdc terminal on the Xylotex board and the other is connected to the same terminal as one wire from the limit switches; in this image it is terminal 10 (the red wire).
The other wire (black) from the switches is connected to the ground terminal on the Xylotex board.
Note: Sometimes limits will be tripped by the noise in the steppers’ wires. Run the wires separately and/or use shielded cable.
On a servo controlled 4 x 8 foot table, there were still false hits even after the debounce interval was adjusted in the software and shielded wires were used. Finally the problem was solved by placing 4N25 opto-isolators between the limits and the computer.
So...
Limit switches protect the table from damaging itself when the steppers are commanded to move beyond the travel of the machine. With smaller motors, limit switches are not as critical as they are on more powerful tables since the smaller steppers will stall before inflicting extreme damage to the table. However, they may pull the machine out of tune. Larger motors can strip threads or otherwise pull the machine apart. It is easy to jog too far with fast machines such as the belt drive and rack and pinion tables, and limits keep small mistakes from becoming major problems.
Hope this clears up any questions you may have about limit switches !Last edited by Lee Roberts; 18-12-2008 at 08:35 PM.
.Me
-
The Following 2 Users Say Thank You to Lee Roberts For This Useful Post:
-
12-08-2007 #2
Yes you are bang on. They limit the movement so you don't crash into the end stops.
A lot of the cheaper builds don't use them as a cost cutting exercise and just rely on the operator making sure his work envelope stays with the limits.
Not to bad on small machines as they usually just stall and loose position.
The larger industrial servo machines can do serious damage if they hit the end.
I have seen heads ripped off laser cutters when they have gone walkabout.
Three options and combinations of :-
[1] Don't bother and try to stay within limits
[2] Fit switches and wire up.
[3] Mach 3 has what are known as "Soft Limits" These are software limit switches that tell the program you can only go xx in that direction. You do need to set these from job to job as they only run from 0.0.
My router which is a Techo Isel bridge router was bought S/H with no motors or mounts fitted but it did have the nessesary linear rails and ball screws. This had crude limit switches which I ripped off as they were broken and bent.
At the moment it has no switches but I recently bought 3 reed switches and 6 magnets from RS as fitted to door and window alarms, very cheap about £1.50 a part and only accurate to about 3 to 5mm but as I don't need to home, only act as a limit I think they will work OK.
One switch per axis and a magnet at either end of the travels. Cuts wiring down and will look neat but time and testing will tell.
John S.
[edit] Not sure what's happening here but the * should read f-i-t-t-e-d somehow the software doesn't like that word ?John S -
-
12-08-2007 #3
Intresting ill take a look into this.
Yea f.i.t.t.e.d must be in the word censor i added last night, reminds me i need to post about that and let everyone know. Ill remove that word, the list of offensive words came from a guy in another country so maybe that word is offensive to them..Me
-
24-08-2007 #4
Limit switches are essential in my view... and they are much more useful than just to prevent something going off the rails so-to-speak. Having said that 30p spent on a micro-switch can save you thousands of pounds in damages.. which is worth it in itself. The day your gantry falls off the end of your table will be the day you decide should have used a limit switch....
Also each time you set up for a job you will need to have a referenced position in relation to the stock... Same goes with tool-changing ... or setting up for a different job..... this is soooo much easier when you can ref the tool position in relation to the table overall. You can only really do this using switches... Also, if there is any kind of problem with the cut and you have to re-start the job.. you will need to do so from a known position.
You can just ref off the stock each time.. and on a small machine sat next to the controller this might be an acceptable way to work for you... but for peace of mind and ease of use I'd recommend home and limit switch on each axis....
-
24-08-2007 #5
Ok, Yohudi can you start me off then please mate as i have no idea where to start with this.
You'v seen my build log right, so if we need to a new post would be good. If you let me know what information i need to give you ill post that up promtly, everything to do with my build is on here anyway.
Ill keep it short and sweet while you get back to me. :-).Me
-
24-08-2007 #6
Hi there,
Limits aren't that difficult but to a degree the way you implement them depends on the facilities offered by your breakout board... or in your case the Dsub board... there are usually about 5 pins dedicated to input, which looking at the pic I can see the Dsub board has. In your CNC control software you will be able to assign functions to these inputs based on pin numbers.. Estop , Limits or Encoders are usually the functions assigned.
Just looking at limits they operate as follows:- Use a normally open switch, when the software detects any of the assigned inputs switching closed it stops ALL motors. In the case of Estop it similarly stops ALL motors. Shared Home/-ve limits operate slightly differently to just a simple limit. When homing the control software moves each axis until the switch is triggered then advances a small amount off the switch to a known position. When NOT homing if the shared switch is triggered then ALL motors are stopped as with a bog standard limit. A lot of this is down to the features available in the software you plan on using. It's one of the reasons I went with Mach2/3 myself as it has ALL the bells and whistles IF you want to implement them.
It's usual to assign a separate input for each axis home position/-ve limit, this uses 3 inputs. Then a further single input can be used for all +ve limits, this is called summed limits. The remaining input can be used for a separate Estop or enable function... again on a normally open switch. If you plan on using the inputs for other purposes it is possible to sum the home/-ve limits too... but then you have to ref each axis 1 as a time instead of being able to ref all.
I've upped a rough diagram based on a pic from your build log with suggested trigger/switch positions. I'd mount the switches to the base/frame so that the blocks of your moving parts would trigger the switches or you can preferably use adjustable trigger blocks. This avoids having the wiring to the switches in motion and also means it's easy to move the trigger block to adjust the point at which the limits are switched. You don't have to use expensive cable for limit switches.... they are normally open for starters so there's no signal/voltage in the circuit anyway. micro switches are as good as anything.. I use micro switches on my Y axis and Z axis and have excellent positioning and repeatability which I've tested using multiple-passes over the workpiece.
If there are no docs related to limits etc with the hardware you bought then I suggest a good read of the Mach2/3 manual which has a good discussion of the subject and you can then relate this back to your own hardware.
hope this helps
oh BTW... I notice you are located in Wigan... I used to, work down the road in St Helens up until 1989.. for a firm called Sutton Timber.. maybe you know the place as it's a sizeable timber/UPVC fab setup.. then again maybe not...
-
12-10-2007 #7Does a 30p microswitch really have that degree of repeatability?
 Originally Posted by Yohudi
Not saying it doesn't, just curious.
And what about the z axis where you want to detect the tool tip rather than the slide position? That'd be tricky with a microswitch.
I keep meaning to fit them but I have these nagging doubts, everytime I look at it I start drawing long amplifying levers and schmitt opto switches :D
-
22-06-2008 #8
Could someone please tell me what wire I should be using on my limit switches?
Would 7/02 equipment wire be ok to use or?
Cheers,
CM
-
22-06-2008 #9
Ok so mike over at routoutcnc.co.uk has been in contact and its screaned cable i need to be using.
So now we know !no 7/0.2 will be fine longs as it's screaned
-
23-06-2008 #10
If you want a microswitch to set the zero point, rather than spot a whoopsy, make sure you always use the same transition. They have huge hysteresis.
I prefer an opto slot. They usually move from high to low in a fairly straight line as the beam is interrupted. Reading it is slightly tricky because logic gates have big hysteresis, so, you add a comparator and get no hysteresis at all. Switches perfectly in either direction.
Any cable will do, if worried about interference, twist it :D
Thread Information
Users Browsing this Thread
There are currently 1 users browsing this thread. (0 members and 1 guests)
Similar Threads
-
EMC2 home/limit switches... only acting as limit?
By vputz in forum LinuxCNC (EMC)Replies: 4Last Post: 15-10-2014, 09:51 AM -
Limit Switches
By Leadhead in forum General ElectronicsReplies: 1Last Post: 16-10-2013, 10:41 AM -
Limit switches and Mach3
By cropwell in forum Artsoft Mach (3 & 4)Replies: 1Last Post: 06-03-2013, 10:51 AM -
Limit Switches with LED's
By manofgresley in forum General ElectronicsReplies: 30Last Post: 02-01-2013, 03:08 PM -
Uniport and limit switches.
By D-man in forum General ElectronicsReplies: 14Last Post: 13-02-2012, 11:37 PM


 Reply With Quote


Bookmarks