
Thread: Sieg SX2.7 CNC conversion
Hybrid View


-
04-01-2017 #1

 Last Activity: 3 Days Ago


Nice to see another KFlop user on here!
I'd personally go for a belt reduction, but if trying direct mount is relatively easy, it's worth trying. Whether it will work, will most likely depend on what you try doing with it.
The worst thing I would expect to highlight any lack of torque, would be during drilling, especially when you try retracting the drill, when you're fighting against the weight of the head and the drill still trying to dig in.
Regarding the EM drive being noisy, have you ran the autotune function?Avoiding the rubbish customer service from AluminiumWarehouse since July '13.
-
04-01-2017 #2
Last Activity: 6 Days Ago

Hi m_c, the Kflop is great isn't it:)
I may ask you about limit switches with the Kflop, as no doubt you have done it. I would like to use IO0 to IO4 on the JP7 connector, but I've never done this. I will reserve the question for later on, one thing at a time:)
Regarding the EM drive, it's not particularly noisy, just the usual little buzz that some drives emit on standstill, which can get annoying over time. Yes, I tried the dip switch4 down and up. I did the same with the AM882 which I have on the other axis, identical setting and motor, but this one doesn't make any noise. I seem to remember I have the little yellow selector wheel with the arrow on 4 which selects a particular Leadshine motor and applies relevant parameters. I may try and set the wheel to something else and see what happens.
Edward
-
04-01-2017 #3
Last Activity: 6 Days Ago
Hi,
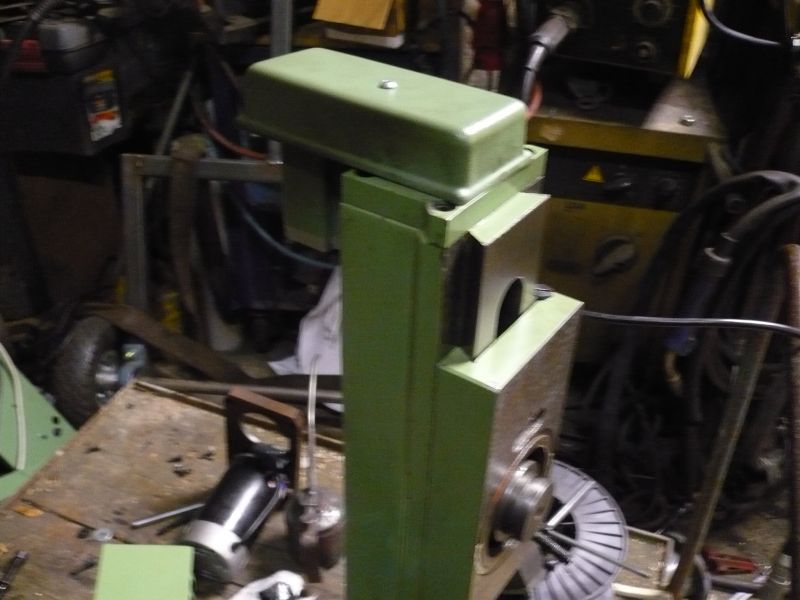
Today I fitted the Z axis ballscrew. I had to drill the top of the column, a hole of about 18mm. it wasnt fun as my drill bits only go up to 12mm, and it takes forever to enlarge the hole with a Dremel. Then I remembered I had these cone shaped drills that drill in ever larger steps. Thereafter it was a piece of cake.
I havent machined the top plate yet, but by connecting the FK12 at the top plus a handy little lever I made to crank the ballscrew in both directions, I could get a rough idea of the effort needed by the motor.
Basically, to move the head down requires zero effort. In fact, if you are not careful it may start to roll down by itself. A question of adjusting the gib a little, I think, just to hold the head still.
Cranking it up requires more effort, for instance, more than moving the X or Y axes, but not drastically more. I think the 3.1 Nm motor will move it well with direct drive. We shall soon see .otherwise maybe a 4Nm motor...
In the future, I may attach a gas spring, if anything just to ease the effort on the motor and to hold the head stationary when the motors are disconnected.
I think for the moment, I may have to use the gib tightening lever when I am not using the mill, just in case the head decides to roll down and smash something pretty badly. I hope I remember to loosen the lever when in use!
Tomorrow, machining the thick plates to fit the bearings and motor, with the manual mill, painful, or as the French say...quelle horreur!
Edward
-
05-01-2017 #4
 Last Activity: 23-09-2017

Use a 2:1 reduction and you won't need a gas strut
 John S -
-
05-01-2017 #5
Last Activity: 6 Days Ago
Well, in view of your opinions, I am going to cut to the chase and go for 2:1 pulley reduction for the Z axis, as I already have 40th and 20th AT5 pulleys in my stock anyway. Just ordered the right length of belt. Also, by having belt reduction, I will be able to tighten the gib a little more, making the head firmer and at the same time avoiding the rolling down by itself. On the upwards move, the double torque gained by the reduction will help too.
I will be using the Lenze type locks for the pulleys, as I prefer them to ordinary set screws. I'll have to put the motor to one side rather than to the back of the column like John shows, only because the column cover gets in the way, and also because of the depth of my table. Eventually I will also print a neat cover to protect the belt/pulleys.
EdwardLast edited by Edward; 05-01-2017 at 12:32 PM.
-
10-01-2017 #6
Last Activity: 6 Days Ago
Just finished the Z axis as recommended, with a 2:1 reduction. It works well and not a hint of any struggle with a 3.1Nm Nema23 So I am glad I went for the pulleys.
I minimised the AT5 belt run so the motor was as close as possible to the column, to one side.
Now I am fitting a swarf guard at the front of the Y, as this particular model doesn't have any bellows there to protect the ways from dirt. So I am just fitting a U-shaped metal cover plate, 190x190mm attached to the saddle so it moves in and out with it.
I will now move to other sections of the forums to hopefully get advice or contribute. Thanks.
EdwardLast edited by Edward; 10-01-2017 at 12:35 AM.
-
10-01-2017 #7
Last Activity: 1 Day Ago


Edward How about keeping the build log here so that all questions related to it will be in one place as that helps others doing a similar conversion?
..Clive
The more you know, The better you know, How little you know

 Reply With Quote
Thread Information
Users Browsing this Thread
There are currently 1 users browsing this thread. (0 members and 1 guests)
Similar Threads
-
Sieg X3 Conversion
By Vikash in forum Milling Machines, Builds & ConversionsReplies: 8Last Post: 04-01-2016, 05:18 PM -
CONVERSION: Need some help with a new SIEG SX2 Plus CNC Conversion
By Onocyclone in forum Conversion Build LogsReplies: 22Last Post: 17-09-2014, 01:00 PM -
CONVERSION: Sieg X2 CNC Conversion
By A11an in forum Conversion Build LogsReplies: 17Last Post: 16-01-2013, 06:06 PM -
CNCFusion Sieg X1 CNC Conversion Kit
By rd84 in forum Gantry/Router Machines & BuildingReplies: 4Last Post: 13-07-2011, 03:38 PM -
Sieg sx2 conversion kit
By Goldigger in forum Milling Machines, Builds & ConversionsReplies: 3Last Post: 24-04-2011, 07:42 PM

Bookmarks