. .

Hybrid View

Previous Post Previous Post   Next Post Next Post
  1. #1
    Chaz's Avatar
    Lives in Ickenham, West London, United Kingdom. Last Activity: 5 Days Ago Has a total post count of 1,654. Received thanks 115 times, giving thanks to others 71 times.
    Quote Originally Posted by Fenza View Post
    What super plasticizer are you using and where are you getting it from?

    http://www.concretecountertopsupply....turesPozzolans
    Is the best place I've managed to find.
    I dont know the make. Im getting it from the guy in Germany where I buy the rails and other stuff from. It wasnt cheap, he works in the industry so largely trust what he supplied. Ill try find out.

  2. #2
    Hi Chaz
    just thought i would mention this, regarding the build up of your reinforcing structure.
    Years ago i built a trailer and installed bosses into the box section to support the tailgate, machined/drilled and first tapped the holes in the boss with the intention of finish tapping after they were welded in to the frame.
    The carbon content of the steel used for the bosses was unknown and as it happens must have been sufficient to harden the inserts, i was unable to finish tap the holes after welding and had to cut the bosses out and remake with mild steel, so make sure your rail supports are mild steel and even do a test piece to make sure.
    Good luck
    Mike

  3. #3
    Chaz's Avatar
    Lives in Ickenham, West London, United Kingdom. Last Activity: 5 Days Ago Has a total post count of 1,654. Received thanks 115 times, giving thanks to others 71 times.
    Quote Originally Posted by mekanik View Post
    Hi Chaz
    just thought i would mention this, regarding the build up of your reinforcing structure.
    Years ago i built a trailer and installed bosses into the box section to support the tailgate, machined/drilled and first tapped the holes in the boss with the intention of finish tapping after they were welded in to the frame.
    The carbon content of the steel used for the bosses was unknown and as it happens must have been sufficient to harden the inserts, i was unable to finish tap the holes after welding and had to cut the bosses out and remake with mild steel, so make sure your rail supports are mild steel and even do a test piece to make sure.
    Good luck
    Mike
    Thanks. In this case, there will be no metals 'sunk' into the structure.

    Mounting will be directly onto the concrete however there will be a layer of DWH 'epoxy' to provide the flatness needed. The nuts will put into place after the structure has hardened and will be held with epoxy.

  4. #4
    Hi Chas
    Sorry but i can't get my head round how you are going to fix the rails to the concrete or set the rails perfectly straight and co planar prior to injecting the epoxy, could you run through it step by step (for a dummy)
    Mike

  5. #5
    Chaz's Avatar
    Lives in Ickenham, West London, United Kingdom. Last Activity: 5 Days Ago Has a total post count of 1,654. Received thanks 115 times, giving thanks to others 71 times.
    Quote Originally Posted by mekanik View Post
    Hi Chas
    Sorry but i can't get my head round how you are going to fix the rails to the concrete or set the rails perfectly straight and co planar prior to injecting the epoxy, could you run through it step by step (for a dummy)
    Mike
    Sure. It's probably a slight different way to do it, but Ill try and explain as best I can.

    1. Cast the concrete, try and get it reasonably flat. Is it 'good enough', no.
    2. Clean the concrete, grind the area to prepare for the DWH putty (or liquid, there are 2 options).
    3. Place the putty along the location where the rail will sit (so in my case, roughly 50mm wide x 2 lengths).
    4. Place a reference surface against the putty. The reference surface has to be perfectly flat (well, to whatever tolerance you need / want). The reference surface should have a release agent so that it does not stick to the putty.
    5. Putty dries, remove the reference surface, the putty is now hard and has formed against the reference shape.
    6. Either drill holes or remove the material used to block the holes (wood in my case). The putty would have cured over this.
    7. Epoxy the M12 nuts into place, using the rails in location and putting a release agent around the bolts and threads of the nut.
    8. Wait for the epoxy to cure, then tighten up.

    The 'key' here is the reference surface. This has to be perfect. Ideally the X and Y are done by the structure and at the same time. Im still working on how best to do this. I have a granite surface plate which Ill likely use. I can make some surfaces on my mill (perhaps not as accurate) or I can cast putty against mild steel which is then 'correct' against the granite surface plate which is then in turn used for the machine.

    Here is a vid of similar. They use a putty, drop the surface onto it. This is moglice .... not the same, but the principle is the same. The putty will form a 'perfect' copy of whatever you place against it and its as hard as concrete once cured. Its fairly expensive stuff. You also get it in liquid form which can be poured between two surfaces.

    https://www.youtube.com/watch?v=BZuEH4nyBtw at 4min35 you will see what they have, once they lift the top surface, is a perfectly aligned surface. Once cured, its as hard as the concrete and has a similar hardness rating.

    https://www.youtube.com/watch?v=dKdanHZmV_k this is a similar idea. The key is to have the 'master' to reference against.

  6. The Following User Says Thank You to Chaz For This Useful Post:


  7. #6
    Chaz's Avatar
    Lives in Ickenham, West London, United Kingdom. Last Activity: 5 Days Ago Has a total post count of 1,654. Received thanks 115 times, giving thanks to others 71 times.
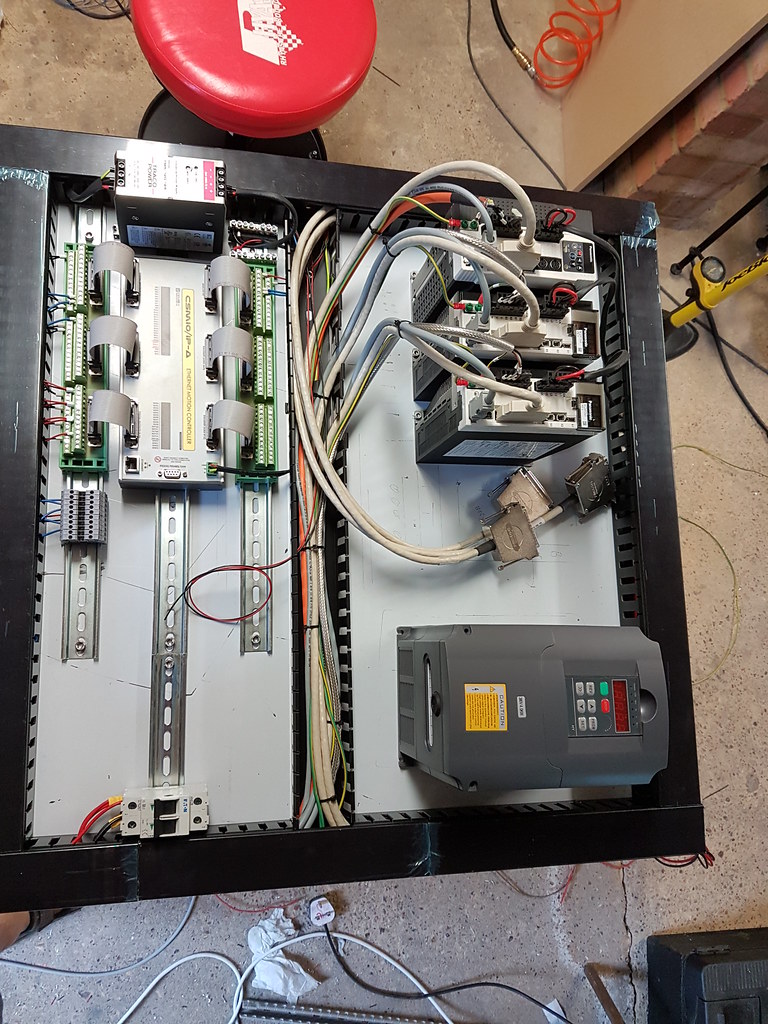
    Electrics now mostly done. Running 2 of the 3 axis in the video below. I'm missing a plug needed for the 3rd drive but all tested and runs. I still need to wire up:-

    Spindle (when I decide what Ill use)
    Limits
    E Stop etc

    Some pics below showing the 'mass' of wiring and what it looks like near completed. Still need to remove the white protective cover from the plate.

    https://www.youtube.com/watch?v=RLCvlyi4Z_E


  8. The Following User Says Thank You to Chaz For This Useful Post:


  9. #7
    Chaz's Avatar
    Lives in Ickenham, West London, United Kingdom. Last Activity: 5 Days Ago Has a total post count of 1,654. Received thanks 115 times, giving thanks to others 71 times.
    Starting to finish off the mold for the first casting as well as one of the bearing holders for my Y leadscrew.

    The part was flipped over as its 50mm deep, my probe doesnt have the best accuracy so there is a 0.2mm or so step, doesnt affect the part however.


Thread Information

Users Browsing this Thread

There are currently 1 users browsing this thread. (0 members and 1 guests)

Bookmarks

Posting Permissions

  • You may not post new threads
  • You may not post replies
  • You may not post attachments
  • You may not edit your posts
  •