
-
17-07-2016 #141

 Last Activity: 06-07-2022


Hi Dave,
I have taken photos as part of my advert so thought I would share just to give you ideas.
Started off with a plate that I flattened and cut out holes to allow access to the tramming bolts and the quill front. Used the two steps on the front of the head as a means of alignment but found they were about 0.5mm off plain. So I have shimmed the one of the flats.
Behind the ballnut you will make out a socket cap screw that engages with the actual casting where I drilled and tapped an M8. The box above I made using some scrap piece of 6mm plate and practiced my aluminium welding.

The ball nut mount is made up of two parts that sort of dove tail into each other. This part is made of mild steel and I was well chuffed to get the clearances between the parts to 0.05mm. The two parts are held together by the M8 socket cap just behind the ballnut. I could thus home the Z, undo the screw and use the quill manually.
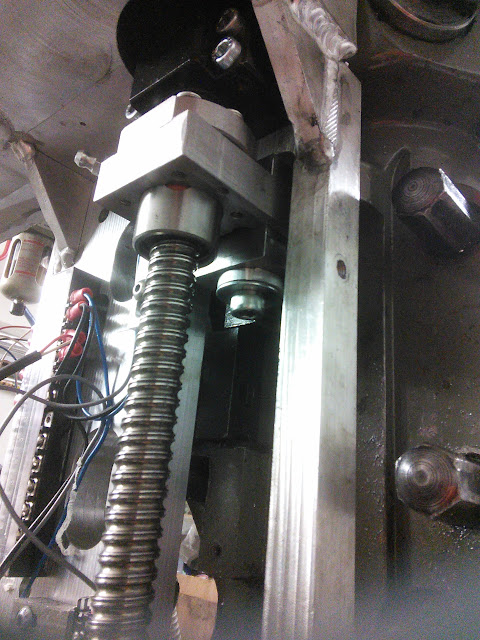

The mounting plate is secured on the bottom through the old feed hole in the front using a top hat boss which allows me to not lose too much quill travel.


On the side, since the quill powerfeed is not used any more, I have used the holes to mount a side brace. If you notice there is a small M4 screw just under the elbow of the pressure regulator, this is to tension the belt of the motor. I have built this kind of tensioner in all the axes of my machine.

Yours is bound to look prettier of course, hope you got some ideas though.https://emvioeng.com
Machine tools and 3D printing supplies. Expanding constantly.
-
17-07-2016 #142
Last Activity: 20-12-2024
Its all about function not pretty :) And that looks nicely functional, thanks for sharing.
20mm screw?
Air collet closer too?Last edited by Davek0974; 17-07-2016 at 09:15 PM.
-
17-07-2016 #143
Last Activity: 06-07-2022
Thanks! It is pneumatic impact wrench type drawbar in a nice package. There are plans for one on the net too. You press the green button a bit and it unscrews a specially ground R8 collet.
You may have seen I use (and sell) the repeatable Z offset ER collet chucks which makes life infinitely easier when running multiple toolchanges. Measure the tools beforehand, enter them into the tool table and swap them out when needed. plenty of videos of them on youtube (search TTS tooling).
R's
Screw is 1605Last edited by komatias; 17-07-2016 at 09:22 PM.
https://emvioeng.com
Machine tools and 3D printing supplies. Expanding constantly.
-
The Following 2 Users Say Thank You to komatias For This Useful Post:
-
17-07-2016 #144
Last Activity: 20-12-2024
TTS looks useful, will look into that.
-
19-07-2016 #145
Last Activity: 20-12-2024
Threw some panel buttons into the mix today, also fitted LED's for little bling ;)
Video here...
-
19-07-2016 #146
 Last Activity: 19-01-2024

Why do the other lights come on when press cycle start.? Presume they are Feed hold and Stop.!
Are you turning lights on using Outputs and Macro pump.?
-
19-07-2016 #147
Last Activity: 20-12-2024
Yes my thoughts were that when idle the Cycle start and Spindle Toggle would be active and when active the Feed-Hold and stop would be active. The logic is that the lights indicate rapidly what a possible action would be.
I could go one step further and use the lamp supply as the switch source so only the lit buttons would do anything but i think Mach has that pretty much covered anyway.
Yes, I have a small bit of code in Macropump.m1s and an output feeding a relay, the lamps run from the N/c and N/o contacts on that relay.
The macropump code checks two omelette's for run or feed-hold.
Edit..
Frigging autocorrect - that last line should read....
The macropump code checks two oemled's for run or feed-hold.Last edited by Davek0974; 19-07-2016 at 10:01 PM.
-
19-07-2016 #148
Last Activity: 19-01-2024
I do similair thing with the control panles on my routers but it just checks Mach led's and turns on/off outputs accordingly to whats active. I use 24V led's which the Outputs turn on/off directly.
-
19-07-2016 #149
Last Activity: 20-12-2024
Nice,
I'm only using the relay as the two lamp patterns are directly opposite each other so i just use both N/o and N/c on the relay. LEDs are 24v but this seemed easier and only used one output;)
-
21-07-2016 #150
Last Activity: 20-12-2024
The Z-axis is doing my head in

My idea of welding it together is doomed to failure I think - the original bridgeport quill stop is porous and soaked in oil, any attempt to weld it simply creates a pool of oil and crap welds. I managed to tack it up but that only got me to my next headache....
Alignment is being a bitch - I can't seem to find a position where all the parts just play nicely, there is a fair amount of stress and strain between the screw and the quill, it can be moved up and down by hand but I'm not happy with it from an engineering point of view.
Not sure how to sort this at the moment, a right PITA.
I might just bolt the two parts together and see how it goes, that will allow me to shim things here and there for alignment, seeing the one from Komatias above being held by an M8 screw makes me think this might work.

 Reply With Quote
Thread Information
Users Browsing this Thread
There are currently 1 users browsing this thread. (0 members and 1 guests)
Similar Threads
-
Milling machine CNC conversion - keep hand wheels for manual operation?
By birchy in forum Milling Machines, Builds & ConversionsReplies: 5Last Post: 23-10-2016, 08:29 PM -
Manual autochanger problems.
By Saracen in forum Lathes, Lathe Rebuilding & ConversionsReplies: 1Last Post: 05-02-2015, 01:14 AM -
WANTED: Centec 2A manual
By Web Goblin in forum Items WantedReplies: 0Last Post: 03-09-2012, 09:56 AM -
Translating the manual
By Robin Hewitt in forum Moulding MachinesReplies: 22Last Post: 01-09-2012, 01:21 PM -
Bridgeport Conversion
By Tony Goodwin in forum Bridgeport Milling MachinesReplies: 0Last Post: 08-08-2011, 08:11 AM

Bookmarks